Showing posts with label desserts. Show all posts

Saturday, 27 February 2010

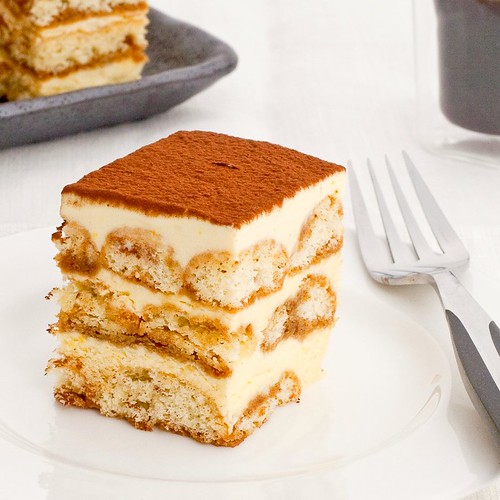
gluten free tiramisu, daring bakers feb'10


The February 2010 Daring Bakers’ challenge was hosted by Aparna of My Diverse Kitchen and Deeba of Passionate About Baking. They chose Tiramisu as the challenge for the month. Their challenge recipe is based on recipes from The Washington Post, Cordon Bleu at Home and Baking Obsession.

I greeted this Daring Baker's challenge with some degree of trepidation as tiramisu is not a dessert that I have chosen to eat very often over the years.  I have never seen a gluten free version which means my memories are even more vague and I am dredging back a long way for a point of reference.

According to the Daring Baker hosts, Aparna of My Diverse Kitchen and Deeba of Passionate About Baking, this is the story behind this rich dessert:

"The perfect Tiramisu is a balance of flavors of a sweet zabaglione, strong coffee, marsala wine, creamy mascarpone cheese and the dusting of unsweetened cocoa.  
Tiramisu is said to have its origins in Treviso (Italy), and there are quite a few stories about how it came to be created.  One story traces the tiramisu as far back as the Renaissance claiming that it was first made in honour of the visit of Grand Duke Cosimo di Medici to Tuscany. Yet another one points to the tiramisu being an adaptation of the "Zuppa Inglese" referring to the sponge cake and cream layered English Trifle.  However, experts in this area generally agree that the tiramisu as we know it today, was born in the ‘70s.  Some believe that the Tiramisu was created in the the Le Beccherie (a restaurant in Treviso). Others suggest that Tiramisu was first made in 1971 by an Italian baker named Carminantonio Iannaccone in a small bakery in Treviso, Italy."

I love the fact that two passionate bakers from India are encouraging us to create a multi-faceted dessert from Italy in our many kitchens all around the world.  That is the Daring Bakers for you!

For any-one who cares (and that includes me!) tiramisu, or rather tirami su literally means "pick me up" or "pull me up" in reference to the effects of the sugar and espresso in the dessert.

There were no shortcuts in this recipe and method, the challenge was made up of 4 technical components, all of which had to be followed in order to successfully complete the challenge.  The whole process took me 5 sessions to complete, baking the biscuits and making the cheese in evenings during the week, then starting the zabaglioni and the pastry cream early on a weekend morning before constructing and chilling the dessert later the same afternoon.  Of course, as all bloggers know, the dish isn't completed until photographed and written up so that accounts for the final session today.  I am very glad that I chose to complete this challenge very early in the month as I think I would have panicked if I had left this to the last minute!


As this dish is quite complex, I am going to break down the elements into separate posts which I will add in the next few days:
  • savoiardi biscuits
  • home-made marscapone cheese
  • cooked zabaglioni
  • pastry cream 
Each component is a valuable technique in its' own right and very useful in a baker's repetoire.  Compiling the dish seems a touch bizarre after all the effort that goes into making the elements.  Fundamentally, you just mix all the sauce elements together until they are creamy, then layer the cream with the savoiardi biscuits.  Ta-daa!! Tiramisu :)

tiramisu

Thursday, 18 February 2010

orange & cardamom marmalade bars


UMME5EB3TG5E
Now that I have made marmalade, I am constantly thinking of recipes to include it.  I really don't want to find any jars stuffed at the back of a cupboard two years down the line.
I have been working in the bakery at work for the past couple of weeks.  We are busy with new customers so the orders are coming in fast and furiously and it is all hands on deck.  At present though, we just don't have enough hands so we are all flat out all day trying to get enough baked and packed to fill the pallets quickly enough.  It is always good to be back doing the hands on work but the collapsed discs in my back are screaming out by the end of every day and it is all I can do to swallow some food, painkillers and collapse.  It is almost unheardof for me, but twice this week I haven't even had the energy to turn my computer on at home!
I spend my days thinking of healthy sensible recipes that I can make at home which will sustain me during each working day and ensure that I finish the day feeling healthy rather than drained.  However, having made marmalade this week, everything I make this week is going to contain this rich bitter jam and so will not rank too highly on the health scales!
orange marmalade bars

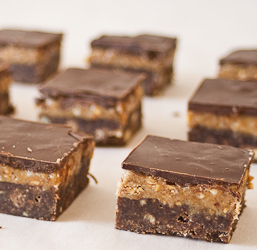
This bar is (yet!) another variation on Nanaimo bars, but the filling is a blend of bittersweet marmalade and custardy cream.  With a crushed chocolate biscuit base and a chocolate topping, it is also a more substantial take on jaffa cakes.  I have changed the recipe a bit, to lower the sugar content and take out the raw egg in the base.  I am really looking forward to the bitter note of the marmalade cutting through the sweetness of the custardy layer and the chocolate on top.  A little piece mid-afternoon should give me just enough ooomph to get me through till the end of the day & see me home with a smile, I hope, and that will definitely make me more popular in my house!

orange & cardamom marmalade bars
base layer
  • 100g butter
  • 10g ground flax with 30g water
  • 300g gluten free chocolate shortbread crumbs
  • 50g ground almonds
  • 25g icing sugar
  • 1/2 tsp vanilla extract
  1. Line an 8" square baking tin
  2. Melt the butter
  3. Mix flax and water & leave to stand for 5 minutes.
  4. Add 1/2 tsp vanilla extract then stir it all into the butter.
  5. Stir the butter mix in to the crumb then pour into the prepared tin.
  6. Press in to create a firm even base, chill until the middle layer is ready.
middle layer
  • 100g softened butter
  • 100g marmalade (I used my orange and cardamom recipe here)
  • 25g custard powder
  • 125g icing sugar
  1. beat butter and marmalade together until smooth and creamy
  2. sieve the icing sugar and custard powder together then add to the butter
  3. beat with a hand beater until well combined and smooth
  4. spread over the biscuit base and chill
top layer
  • 55g milk chocolate
  • 60g (70%) dark chocolate
  • 25g butter
  1. melt chocolates and butter together over a low heat or in microwave
  2. allow to cool (but still liquid)
  3. pour over the middle layer and chill until set

Friday, 29 January 2010

gluten free peanut butter shortbread bars

I have been making more than my fair share of exceedingly sweet things this month, as I have completed my first Daring Baker's challenge.  I usually actively try to avoid baking really sugary treats, as I find sugar so addictive that I have to exercise extreme will-power not to eat everything at once.  However the rest of the family are rather partial to sugary snacks, so I have made the odd recipe to keep them all happy!

peanut butter shortbread bars We are having a big, big clear out of our small, small kitchen at present in preparation for a bit of a re-jig to make the workspace a bit more practical.  So every evening has seen me with my head stuck right to the back of the cupboards, packing boxes and investigating sell-by dates.
And oh, the shame! One unidentifiable tin was dated 1-10-2003 which means that it has moved house with us at least once and possibly up to 3 occasions.  The label was gone and whilst I was quite happy to open and investigate, I was out-voted and the tin was binned.  We had the weirdest selection of wafer biscuits and digestifs from central European countries, pasta from East Germany (thank you to the many language student visitors) as well as a random selection of cup-a-soups (some of which are now out of production, does this make them collectors items?) which pre-dated my going gluten free.  It is going to take a while for us to get the kitchen re-organised, so I can only apologise for the fact that I will continue to be a bit light on new recipes for the next couple of weeks.  Once we are there though, we will christen the space with a roast Rib of Beef from Paganum which is taunting me with it's deep red and creamy white beauty whilst patiently waiting for us to demolish it.

In the depths of one cupboard languished a huge tub of wholesome peanut butter, dark brown and chunky, with neither salt nor sugar added.  It was well within date but the tail end has been neglected in favour of a jar of glowing yellow American Skippy peanut butter recently acquired from Costco.  Whilst the flavour of this wholesome version was still great, the contents were drying and lumpy yet too good to chuck, so I looked for a way of using this up.  Another find was a box of homemade biscuits - the last of the shortbread that we made at Christmas as gifts but ungiven due to the snowy weather.  And when a tin of condensed milk rolled out of the cupboard onto my toe (ouch!), a plan was formed.


There are two ways of making this, both are quick and easy but they depend on the ingredients that you have to hand.   If you don't have a bunch of biscuits to hand - and to be honest, if you have to buy gluten-free biscuits you probably don't then want to crush them up and use them for something other than dunking in a good cup of tea - you can bake the base fresh, which is quick and easy too.  Of course, and as usual, you can substitute the gluten free flour ingredients for wheat flour if you want.  You can omit the peanut butter filling and replace it with a jar or tin of ready made dulce de leche for an even quicker recipe.  Both the biscuit base and the baked shortbread base can be used for a myriad of other toppings and bar-style cookies so they are both really handy recipes to have in your repertoire.
I made this last night with the crushed biscuit base, the 3 stages took no more than 20 minutes in total with chilling time on top.  If you freeze your biscuits before you use them, the chilling time will be reduced.

Ingredients

Crushed biscuit base:
  • 100g melted butter
  • 300g crushed gluten free biscuits (digestives, shortbread, any plain biscuits)
  • 25g cocoa powder (if you want a chocolatey base)

    peanut butter shortbread
  • line an 8"x8" square tin with non-stick baking paper.
  • crush the biscuits.  I chucked the biscuits in to a pyrex mixing bowl, grabbed a flat-ended rolling pin and pounded them with the blunt end as if I were using a big pestle & mortar.
  • pour over the melted butter and cocoa if required and stir through until fully mixed
  • press the mixture into the tin firmly and then chill in the fridge until cold and set.
Baked shortbread base (this is a basic traditional shortbread recipe)
  • 150g rice flour
  • 30g cornstarch or maize meal (subtitute potato starch or millet flour if necessary)
  • 120g salted butter at room temperature
  • 60g sugar

  • beat the sugar and butter together
  • add the flour and mix until you have big breadcrumbs
  • press the breadcrumbs into the tin to form an even base layer
  • prick the surface lightly (not all the way through) with a fork every 3cm
  • bake at 160°C for 20 minutes and allow to cool in the tin before adding the next layer
Whilst the base is cooling, make the middle layer ...
  • 85g peanut butter
  • 75g condensed milk
  • 20g custard powder (substitute with 20g tapioca starch, 5g sugar & 1tsp vanilla extract if you can't find or tolerate it)
  • a sprinkling of sea salt
  • beat the condensed milk and peanut butter together until creamy
  • add the custard powder and beat again, the mix will become firmer due to the starch
  • spread the mixture over the chilled base layer and return to the fridge for about 30 minutes
Whilst the middle layer is cooling ...
  • 75g plain chocolate broken in to pieces (I used a 70% Belgian bar available from all supermarkets)
  • 65g milk chocolate (in this case - Galaxy)
  • 25g butter
  • Melt the chocolate ingredients together, keeping the mixture as cool as possible.
  • Allow the chocolates to cool as much as they can whilst remaining runny
  • Spread the chocolate over the cooled peanut butter layer
  • Chill again and allow around an hour before serving.

Thursday, 3 December 2009

daifuku mochi , recipe and method


Being gluten free as well as unable to eat fat limits the sweet treats that I can indulge in.  Whilst this is wonderfully healthy, I do crave the occasional sugary bite.  I was entranced by these soft pillowy chewy treats called daifuku mochi when I first saw them and I was delighted to discover that they are naturally gluten free.
I have found them in long life packs at our local Oriental ingredients store and whilst they taste delicious and are immediate, but that hasn't stopped me wanting to try to make them for myself.
Handling the dough is a joy to anyone used to baking gluten free.  The warm translucent paste is stretchy and pliable in a way that most gluten free doughs never are.  Stretching and pressing gently will allow you to create a thin sheet of dough which can then be cut to form the sweets, though I was very tempted to roll it up and start again, just for fun!
These daifuku are filled with anko, which is a thick sweetened puree of aduki beans.  The teen loves them filled with sweetened peanut butter paste but my favourite is a thick spicy squash or pumpkin puree.   I didn't have any pumpkin around, so went for the more traditional filling of aduki beans.

This recipe makes 12-15 sweets.  Making the sweets themselves took about 1 hour from beginning to washing up (using pre-cooked bean paste).  The sweets can be stored covered for 24 hours before serving or frozen, so they could be made in advance to serve as desserts or sweets.  I had wanted to take photos of the method but the whole process is both dusty and sticky that action photos were not possible, sorry!

Anko (sweet red pean paste)
  • 175g aduki beans
  • 85g white sugar
  • 1/2 tsp salt
    method:
    1. put the aduki beans in 1.5L of cold water and bring to the boil.
    2. let boil at a rolling boil for 10 minutes, then take off the heat.
    3. put a lid on the pan, and set aside for 6-8 hours or overnight.
    4. drain the beans and return to the pan with 1.5L fresh water
    5. bring to the boil again and turn down to a simmer
    6. continue to cook, topping up with boiling water as necessary.
    7. cook the beans until soft for 45 mins to 1 hour
    8. drain the beans thoroughly, rinse the pan then put the beans back in
    9. add 175g sugar (or more to taste) and 1 tsp salt
    10. return pan to the heat and stir to dissolve sugar and salt
    11. mash beans: you can do this using a potato masher, a stick blender or a food processor
    12. if you want very smooth puree, you can sieve the mashed beans to remove the skins (I didn't)
      1. set aside to let the puree cool whilst you make the daifuku dough

      Daifuku dough
      • 100g glutinous rice flour
      • 50g white sugar
      • 165ml water
      method:
      1. line a lipped baking tray with baking parchment and dust thickly with corn or potato starch
      2. sieve the glutinous rice flour into a rice cooker or saucepan
      3. stir in 50g sugar then pour on the water, stirring continuously
      4. stir thoroughly to ensure there are no lumps
      5. turn the rice cooker on or set the pan over a low heat for 10 minutes
      6. allow the mixture to cook, stirring once or twice until it is thick and sticky (you may find you need to add a little more water to ensue the paste cooks to a translucent mass without a hint of powder remaining). 
      7. scrape up the hot paste - it will look like a lump of gluey mashed potato, and completely un-usable, but don't worry, it's fine!
      8. tip the hot paste out onto the lined baking tray
      9. dust your hands and the top of the dough with more starch
      10. press the dough out using your fingers / knuckles to create an even sheet about 4-5mm thick, this takes a little while but isn't that much different from pressing out a wheat dough for a pizza base.
      11. when you have created an even(ish) layer, cut out one piece at a time using a knife, pastry cutter or glass 6-7cm wide.  If you use a knife and cut triangles you will have no wastage at all, otherwise there will be some trimmings.
      12. place 1 tsp of cold bean paste in the centre of  the cut dough
      13. bring opposite sticky edges of the dough together and squeeze to seal, then squeeze all the seals together to create a join underneath,
      14. dust the bottom of the sweet with a little more starch to seal
      15. set each sweet in turn on serving plate
      16. if you are left with some trimmings from the dough, you can re-roll and make some more.  you will have to knead the dough a bit harder to bring it all together before you can press it out again and cut into pieces.  these last few daifuku mochi will have thicker sken and be a bit chewier - I actually preferred these to the rest I made!
          When you are clearing up, don't throw away the starch, pass it through a clean sieve to remove any pieces of dough then store for future use.  And finally, don't throw any pieces of dough down the sink as it will solidify as it dries and block the drain.  Put your utensils to soak then scrape the wet dough off into the bin instead.