Tuesday 29 September 2009

slow cooked japanese mackerel


I'll admit this now.  These are still cooking but I thought I would share the recipe now before I get distracted again.  I have had a day of measurements and maths: weighing ingredients, analysing my old wheat containing recipes, converting measurements and writing new recipes for work before I spend a happy day baking tomorrow.  Anyway, all that meant that I didn't get into the kitchen at home till well after 5.  The mackerel need a good 2.5 hours to cook, so they are now going to be tomorrow's dinner!

I picked up these mackerel from one of our local fishmongers today.  They smelled lovely, were rigid with rigor mortis and glowing with beautiful fresh green, silver & blue tones - fresh from the sea.  This is why I love living on the coast. 

Monday 28 September 2009

All PR is good PR?


Here's a thing.
A small artisan producer decides to host an informal competition to guess the volume of product they make over a period of time.  They ask entrants to send their entries via a public forum so all entries are visible to all other entrants.  Shortly after closing time of the competition, they announce the result of the competition and the volume of product they produce in the specified time.  Strangely the chosen winner of the competition hasn't picked the correct answer.
In fact 3 other entrants were closer. But they weren't the "chosen" winner.
This series of events really interests me.  Twitter, Facebook etc are all about opening lines of communication.  We use these forms to meet new people, share ideas and promote ourselves, our products or ideas.  Most people are completely transparent about doing this which is great.  As a producer or promoter, it is fine to contact people directly and offer free product in the hope - not a promise - that they may blog or tweet about how great the product is.  It is a great and immediate route to both feedback and to your customer.  But when you manipulate the results to promote your product, it seems to say more about you and your standards than you might initially think.
Why do it?

Thursday 24 September 2009

the foodie blogroll


I'm a happy baker!  Today my blog was listed on the Foodie Blogroll.  If you look on the right side of each page on my blog, you'll find a box link to click on which will take you on a culinary adventure around the whole world. 
The foodie blogroll can introduce you to posts from a huge variety of food bloggers from all over the world who are writing on every imaginable culinary concept or foodie feast. 
I hope that you have a couple of hours to spare because once you start exploring, you will lose track of time!
Have fun ;)
Kate

Sunday 20 September 2009

A Hastings' fish roll


You can find Tush and Pat Hamilton making these rolls on weekends, at the fish huts on Rockanore Road in the Old Town in Hastings.  These photos were taken at the Hastings Seafood & Wine festival this year.


Taking little locally-caught dab fillets, they dust them with wheat flour and season before shallow frying the fillets in olive oil in huge paella pans. 


Dabs are a small flat fish that grow no heavier than 400g - more often around 250g. They look similar to plaice and are found all around the coast of the UK.

The cooked fillets are simply served in a fresh bread rolls.


Fresh, delicious, quick and local - food at it's best!

If you are gluten free you will need to make these at home rather than sampling them at the fish huts, as these are prepared using wheat flour.  Use rice flour to dust and serve in your favourite gluten free bread for the sandwich, they are just delicious.


Take 2 fresh dab fillets (or 1 plaice fillet) per person.
Dust in flour.
Season with sea salt & freshly ground black pepper.  
Fry in olive oil til golden on both sides.  
Serve on a roll with a squeeze of lemon juice.  
Eat and enjoy!


Friday 18 September 2009

dim sum, gluten free, yum!


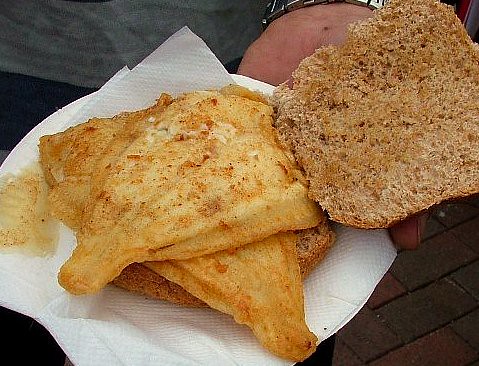
Another snack to share, this time from the far east.  There is plenty of inspiration for gluten free eaters in the whole of Asia but I have missed some of those dimsum classics made with wheat wrappers, so here is a recipe for gluten-free chinese pot sticker dumplings.  Inspired by a lovely photo taken by a fellow food blogger Matt over at Foodforfriendsyeah, I adapted the recipe for the pot stickers from a great recipe and guide by Kate at Glutenfreegobsmacked.  I was so excited by the prospect of making elastic gluten free wrappers, I didn't shop for the filling for either of the recipes above however they came out really tasty (phew!).
I suggest making this dough by hand rather than a mixer as it seems to respond well to gentle handling.  It is definitely one of those recipes that calls for many pairs of hands ( and probably a bottle of wine to share) to make them quickly.

Hope you like them!


* Apologies for the recipe being in cups, I will add the metric measurements next time I make them.

Pot sticker filling:

250g minced pork (I used belly that I minced myself)
200g raw shrimp
4 spring onions, shredded
3cm knob ginger, finely chopped
1 1/2 cloves fresh garlic, finely chopped (use other half in sauce below)
2 tsp chinese rice wine vinegar (or dry sherry)
1/2 tsp salt
2 tbsp corn starch
Blitz this all together in a food processor until it forms a paste.
Chill until the wrappers are ready to be filled.

Pot sticker wrappers:

1 cup rice flour
1/3 cup tapioca starch
1/3 cup corn starch
1/3 cup sweet rice flour
1 tsp xanthan gum
1/2 tsp psyllium husks
1/2 tsp kuzu
1/4 tsp salt
1 large egg
1/2 cup cold water

Method:

Sieve all the dry ingredients together.
In this recipe I have subsistuted the suggested gelatine in the source recipe for a 50/50 mix of kuzu and psyillium husks.  I only have gelatine in sheets so couldn't make an adequate substitution for the 1tsp required in the recipe.  Luckily the kuzu and psyllium seem to work well to make a moist and flexible wrapper that doesn't crack or dry out too quickly.
Beat the egg into the cold water.

Whilst stirring your flour, gradually pour in the water making sure the flour absorbs the water as you go.
Bring the lumps of flour together in the bowl by hand.
If the dough is too wet or sticky add more sweet rice flour, if it is too dry add water 1 tablespoon at a time.

By some fluke the liquid levels were spot on for me and the dough quickly formed a smooth and elastic mass.  I kneaded this for a couple of minutes on a work surfaced sprinkled with a little corn starch  - mostly because it is so nice to be able to knead a gluten free dough, I don't know if it was strictly necessary!

Divide the dough into 4 or 5 equal pieces.  Leave all but 1 piece in a bowl under a damp tea towel.
Dust your work surface with corn starch and roll out the small piece of dough until it is between 1/16th" & 1/8th" thick.  Using a 3-3.5 inch round cutter, cut out as many shapes as you can.  put the circles to one side under a damp cloth and carry on with each piece of dough in turn.  I found that if you collected up the trimmings and sprinkled a couple of drops of water on them, you could combine them into the next piece of dough without any problems.
Carry on until all the pot stickers are cut out.

Now take your made filling and place a teaspoon full in the middle of each wrapper.
Fold the dough over the filling and pinch the 2 sides of the wrapper together to seal the dumpling.  Now you need to niftly create 3 folds in the dough and seal each side tight together.  There is an excellent instruction on how to do this by Jen at userealbutter here with pics too, which is far better than I can provide!

Carry on making the dumplings until you have used up all your mixes.

To cook:

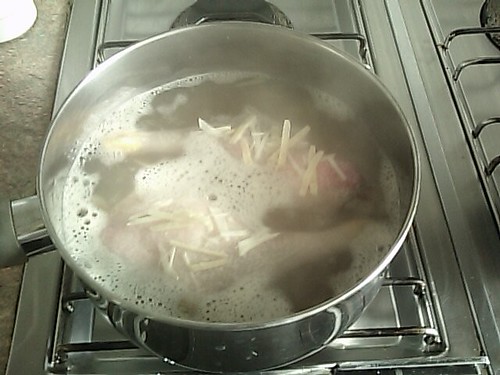
Boil a large pan of water (I added 1/2 tsp salt to the water).
When the water is boiling add some dumplings, enough to create a layer on the bottom of the pan.
Leave the dumplings to boil for 6 minutes, they will float to the surface as they cook but do leave them the full time as, unlikely gnocchi, the wrapper won't be cooked when they first float to the surface.
Heat some rapeseed oil in a non-stick frying pan.
Drain the potstickers and transfer them to the frying pan for a few minutes until they are lightly browned and crispy.    Whilst this batch are fyring booil the next batch, continue until all the pot stickers are cooked.
Serve hot with sweet chilli sauce and this dipping sauce  ...

Dipping sauce (for 2 people):

2 tsp white wine vinegar
1 tsp tamari sauce (gf version of soy sauce)
1/2 clove finely chopped fresh garlic
1cm slice of finely chopped fresh ginger

You can freeze the potsticker dumplings uncooked.  If you do they will need between 12-20 minutes to boil from frozen.

I hope you like these - do let me know how you get on with the recipe and any different recipes for fillings that you may use.

Thursday 17 September 2009

gluten free gougere bites


I am so happy!

I'm standing in my little kitchen, blogging this amidst a pile of gluten free flour bags, cobnuts in 3 states - shelled, unshelled and heaps of the cracked and rejected shell as well as little plates of scones, plums and the general clutter of a day's work.

I took a break in the middle of my working day to try out a savoury idea.  Taking the concept from a David Lebovitz recipe here, I attempted to bake a gluten free version of those little savoury choux pastry balls - gougère bites.
Choux pastry seemed a completely unachievable gluten free concoction but believe me, it is simple - you just need a strong arm to beat the mix and rudimentary piping or spooning skills.
So with a glass of wine and a little pile of these savoury gems, let me share the recipe. Please do try them, it is such a joy to eat something so light and delicious AND gluten free!

Gluten free gougère bites

100g corn flour (white starch not yellow maize flour)
1 tsp xanthan gum
1/4 tsp salt
ground black pepper
100ml milk
75ml water
50g butter
2 large eggs - beaten
90g grated cheese (mature cheddar, parmesan or a mix)
Preheat oven to 220°C

1. Sieve the cornflour and xanthan gum together.

2. Melt butter with liquid ingredients, salt and pepper in heavy bottomed saucepan.

3. Once butter has melted, tip all flour into pan in one go - take pan off the heat and beat until the flour is combined with the liquids.  This will take some doing - and the mix may end up in large lumps rather than in one clump, but that is ok.

4. Put the pan back over a very low heat, immediately add the egg - a little at a time - beating again each time unti lthe egg is combined.

5. As soon as all the beaten egg has been mixed into the batter, sprinkle on 2/3 of the cheese and mix in thoroughly.

6. If you have a piping bag, spoon the mixture in to a bag with a 1.5cm plain  nozzle and pipe the dough into cherry sized balls.  If you don't have a piping bag you can use a thick freezer bag cutting a 1cm hole across one corner to pipe through.  Alternatively use 2 wet teaspoons and form little balls on a lined baking sheet.

7. Sprinkle the finished balls with the remaining cheese and place in the oven for 10 mins.

8. After 10 mins turn the oven down to 190°C and bake for a further 10 mins.

At the end of the baking time, take the tray out of the oven and pierce each puff with the tip of a sharp knife then return to the oven for a further 5 minutes.
Serve the puffs warm - either fresh from the oven or gently reheated - preferably with a glass of wine and friends!
For anyone who has been following the photography steep learning curve - this is the set up that I took the photo above with.  A huge development on the photos I was taking 3 days ago!

gluten free scones


A few weeks ago Madalene at the British Larder posted about strawberry scones here.  I read the recipe and enjoyed the prose but thought nothing more of it, apart from yum!  But I woke up this morning with a real craving for scones, maybe it takes that long for the power of suggestion to permeate my brain (I pity advertisers if that is the case!).  So earlier and more enthusiastically than usual, I leapt out of bed and made these for breakfast.

I haven't tasted scones for years, and for some reason I had decided that a gluten free version would be far to difficult to create.  But it isn't, they are really simple and delicious, so here is the recipe for you to try too.

Simple sweet scones


175g rice flour
50g millet flour
1/2 tsp xanthan gum
1 tsp bicarbonate of soda
1/2 tsp psyllium husks (optional)
a pinch of salt
25g butter (room temp)
50g golden castor sugar
150g plain yoghurt
35g milk


Weigh & sieve the dry ingredients together then rub the butter into flour mix.
Sprinkle over the sugar and stir through the flour mix.
Pour on the yoghurt.  At this point I found it easiest to grab a spatula and cut through the mix as though making pastry, not stirring but drawing the sharp edge through the mix as if cutting with a knife.  Continue until you have brought the mix together into clumps, then add the milk and stir the mix until the dough comes together.

Now you can tip the dough out onto a floured surface and knead it briefly to create a smooth dough.  There aren't many opportunities for gluten free bakers to knead so enjoy it - but don't get too carried away or the scones will end up dry.

Roll the dough out till 1.5cm thick.
Cut out scones around 5cm in diameter, gently roll the leftovers back together and roll again until the dough is all used.  Beware though, that the scones don't like much handling so try to cut out as many as possible in the first go.
Place the scones on flour dusted baking tray and brush with milk to glaze.

Bake in pre-heated oven at 225° C for 8-10 minutes.
Serve warm with butter and jam - enjoy!

Tuesday 15 September 2009

Floyd, my food hero


For me, food divides my life into acts.  
When I was very young, it was the time when I only ran into the kitchen to scrape out and lick clean the kenwood mixer bowl and the tongue-testing kenwood beater.  As I got a little older I realised that if I stayed in the kitchen throughout the weighing and mixing process I could cadge more of the raw mix as well as lick the spoon as we formed the little mounds of batter on the biscuit trays.
Then I was twelve and desperate to experiment with cooking chinese foods at home, making very basic combinations but serving in (to my innocent eyes) the most exquisite bowls bought on my first awe-inspiring visit to Chinatown. 
Soon after that came vegetarianism which, in a timeline, combined with our household gaining 3 extra teenagers at the same time as my mum starting teaching again full-time.  And that was the catalyst for my learning to cook in huge volumes, on a budget, vegetarian chilli, curries and stews.  Beans and vegetables with mounds of rice or home grown spuds to serve 6 seriously hungry teenagers and some left over for mum and dad.
And then came Floyd.
Bursting onto our screens in 1985 he was a larger than life figure who exhibited all the most exotic and yet, to my suburban existence, downright riské traits of drinking and sometimes even swearing on tv whilst creating truly exciting food. I loved every performance and taught myself to drink vast quantities of red wine (Sainsburys Jumilla in a tetrapak, genius packaging btw!) which was a great achievement after teenage years of cider and whisky (eurrgh!). 
But more than that, Floyd taught me to look at and care about the ingredients - and therefore - and the food that I made.  From him I learnt that you had to start with good basics, and, that good basics were not necessarily the ones with the poshest labels.  He taught me that the food from our garden, which I had always dismissed as 2nd rate with blemishes and maggot holes, was better and fresher than supermarket transported ingredients.  That fish from our local fishmonger or meat from the local farm would be better quality than the supermarket frozen packets (how did I know that before, I was 17?) and that these ingredients, prepared with care, some garlic and a glass of red wine, would make a delicious meal.
Cook's perks:  the joy of cooking at home with a glass of wine, one for the gravy, one for the cook!  As I pick up a glass of wine whilst I cook a sunday evening supper, I am often reminded of his sometimes joyous and sometimes frustrated performances which left me, as a viewer a safe distance away from his sharp tongue and sharper wit,  always smiling and always, always more informed as a cook.
Thank you Floyd!

Thursday 10 September 2009

trade show exhaustion


My silence over the past week betrays the fact that I have been completely consumed by the preparation and launch of our new products at the speciality & fine food show at Olympia.  What an amazing few days!  I could moan and say that i haven't had a day off for the last 3 weeks, that every day has been at least 16 hours long and i have talked myself hoarse.  On the other hand, I am so excited about the success of the show, the complete enjoyment of Monday's evening's affair at Fortnum & Masons (along with the opportunity to taste most of the other 3* Gold Great Taste award winners) and a wonderful evening spent with my foodie friend Kate, that I don't feel the slightest bit inclined to moan.  In fact, it has been a blast!
The strangest thing about the show was that I really found very little time to check out other producers.  There was a wealth of new producers and products there and had it been a consumer show, I could have grazed from dawn till dusk.  But there is something about being at a food show in a working capacity which does stop you taking advantage of every proffered freebie or morsel.  So each lunchtime I found myself eating a salmon fillet and salad with my head in a book trying to block out the noise and frenetic activity going on all around me.  By the time i got home after the final day and with a little time to rest, I was craving simple strong flavours and healthy home made food.  You can imagine that the fridge and food shopping has been somewhat neglected over the past few days, so I was delighted to find a couple of ducks legs in the freezer, and with that, the makings of a hearty congee style dish.

Roasted duck soupy rice
2 ducks quarters - cover them in water in a pan, then double the volume of water (if that makes sense?)
2 cm ginger shredded,
1 large clove garlic sliced
1 whole star anise
a couple of black pepper corns (or szechuan pepper corns)

Bring the water up to the boil, then simmer the duck for 30 mins.

After 30 mins top up the pan with boiling water to the level it started at, then add:
250g brown rice (I use Sainsburys brown easy cook italian rice as it has a lovely chewy texture and is higher fibre than normal brown rice). 
1 tsp salt or 1 organic chicken stock cube - of course homemade stock is best but i didn't have any.

Stir, then position the ducks legs on top of the rice and leave to steam over a low heat for 30 mins.


In the meantime turn your oven on to 200 deg C and make a basting sauce with
15 ml tamari (or soy if not gluten free) sauce
10 ml stem ginger syrup (poured off a jar of stem ginger in syrup)
10ml rice vinegar
5 ml hot pepper sauce (I love Frank's Red Hot Original)
15 ml tamarind & star anise jelly (ouse valley foods) if you can't find this, you can use plum jam instead.

After 30 minutes, remove the cooked ducks legs and allow them to cool for a couple of minutes before drying the skin with paper towel.  Put them in a ovenproof dish and spread over 2/3 of the sauce.  Pop the ducks legs into the hot oven for 20 minutes.
During the last 10 minutes, add some finely sliced courgette, peas and baby leaf spinach to the rice pan and leave to steam whilst the ducks legs roasted.
Serve the crispy roasted duck leg on a mound of soupy rice and vegetables with a drizzle of the basting sauce to finish.

I am sorry that I didn't manage to take a picture of the finished product, it looked so lovely, and I was so tired, I just had to dig in - forgive me!