Thursday 26 November 2009

chewy honey & apricot flapjacks


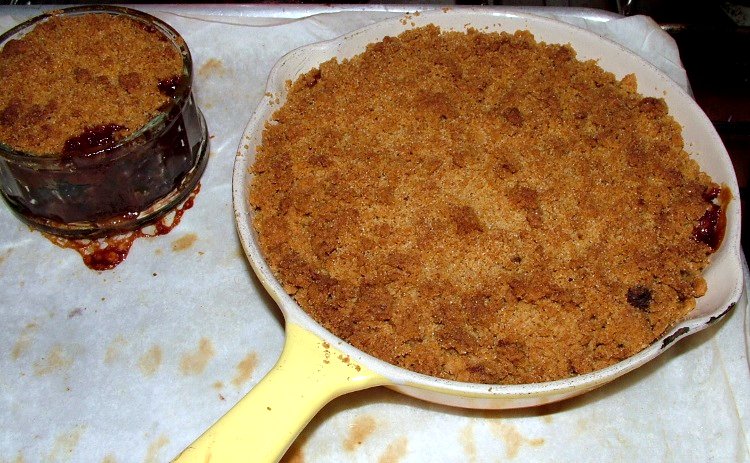
There were just too many mentions of flapjack around me recently to ignore them.  Autumn brings on our desire for comforting snacks full of slow release energy to keep us warm and snug, I used to bake flapjacks almost every day, soft chewy ones too, not crunchy ones but haven't baked any for ages.  When it dawned on me that I hadn't any little snacks for tomorrow's lunchboxes then baking flapjacks seemed to be the obvious solution.

A quick disclaimer: I don't eat oats, (so this is a truly altruistic post)! if you are not gluten intolerent, feel free to skip the next bit and dive straight into the recipe.


I know that I am walking into a minefield by posting an oat-based recipe here.  "Are oats gluten-free?" is the subject of much debate, with some people being able to tolerate them, others not.
Gluten free oats are now available in the UK as well as the states. In the UK you can now buy gluten free oats in all Waitrose stores under the brand "Delicious Alchemy".  I haven't tried them (the recipe below was made with regular oats).  In the states Bob's Red Mill, among others, supply gluten-free oats.
It is worth pointing out that gluten-free in this sense means un-contaminated with gluten.  These oats are often grown on farms and milled on sites that do not handle wheat at all, so there is no possibility of harvest-related contamination.  They are tested using ELISA testing to prove a gluten content of less than 20ppm.
However, some people still can't tolerate oats even with the gluten contamination removed.  In the UK the contamination issue has meant that it really difficult for us to work out whether we are sensitive to the cellular formula of oats, or just the wheat-related contamination. The only way to find out is to try - of course it is up to you whether or not you do.  If you do want to try, then these are the people who can help you:

UK:  Waitrose

USA (& worldwide shipping):  Bob's Red Mill
13521 SE Pheasant Court, Milwaukie, Oregon 97222.  USA
Phone: 001 503 654-3215.   Fax: 001 503 653-1339

Right, with that out of the way, here's the recipe - it is so easy and tastes fantastic!

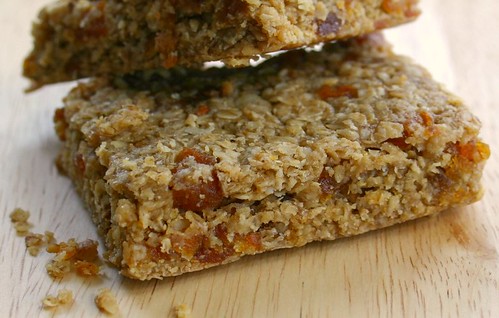
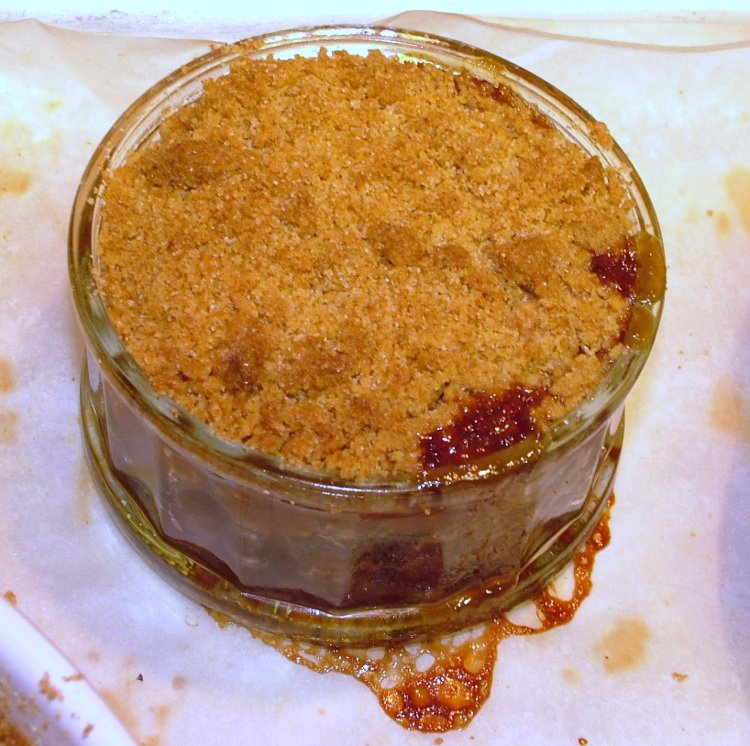
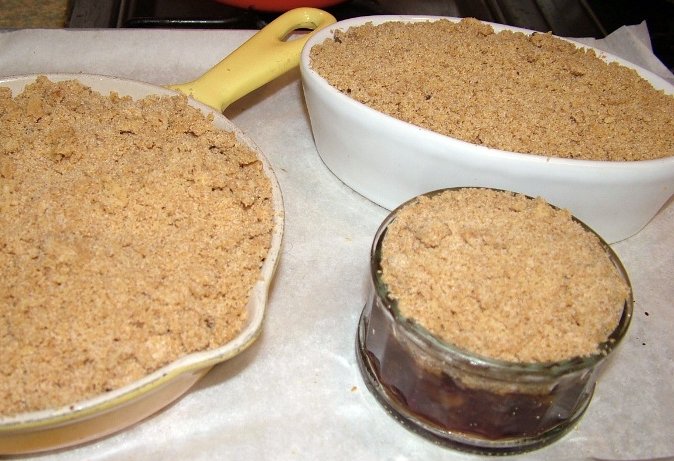
Chewy honey & apricot flapjacks

Ingredients:
  • 140g salted butter
  • 125g light muscovado sugar
  • 30g glucose syrup (from supermarket in cake decorating / home baking)
  • 70g honey (eucalyptus gives a great caramel flavour)
  • 175g apricots, chopped
  • 300g rolled oats (GF if required)
Equipment:  9"x12" baking tin (1" deep) lined with baking paper.
Oven:  pre-heat to 150°C

Method:
  1. put the butter, sugar, glucose syrup and honey in a large saucepan (I use a wok!)
  2. heat over a low heat and stir regularly to ensure it neither sticks nor burns
  3. when the sugar has dissolved add the apricots
  4. stir to cover the apricots in the caramel
  5. add the oats and mix till all the oats are coated in the caramel
  6. press the oat mixture into the tin
  7. bake at 150°C for 20 minutes
  8. take out the oven and leave to cool in the tin for around 45 mins
  9. cut the flapjack into portions before it is fully cold
  10. wrap each piece and store in an airtight container to ensure they stay soft
Beware - the pieces are inclined to crumble if you try to eat them before they are cold, but it is very hard to resist!

Tuesday 24 November 2009

and now for something completely different ...


A day spent in London walking, looking, watching and photographing when encounters with people bring humour, joy and amazement.  And the 'Ghost Forest' is an amazing sight.  Brought to London for just one week by the artist Angela Palmer, the installation consists of huge rain forest stumps positioned around Trafalgar Square.  It was really worth the visit, both beautiful and thought-provoking. You can find out more about the Ghost Forest on Angela Palmer's website here. And there are some more photos on my flickr stream here if you don't have a chance to visit yourself.
Whilst reading and pondering the trees, my eyes caught (but my camera was not quick enough for) a crocodile of japanese business men in ill-fitting suits weaving across Trafalgar Square between the trees perceiving them as obstacles, each clutching a small camera at arms-length and eye-level recording their every step for posterity.  I wondered if they were actually seeing anything around them and whether they would ever watch back their films to experience everything they missed.
A stroll across Picadilly Circus and down Picadilly lead to the RA with the aim of visiting the Anish Kapoor exhibition. Now comes a note to self - get there as early as possible and get in the queue. If you don't, the queue will just get longer and longer all day, we are planning another visit before the 11th now I have queue tactics!
A quick pit stop on Brewer Street for sushi lead us across Piccadilly Circus and into Soho. I was sad to see that the historic Windmill Theatre site has been razed to the ground but relieved to see that elements of the frontage on all 4 sides have been retained.  I am always reminded of blitz photos when I see gaping holes in my familiar London streetscape - not because I was there (!), but because the hastily re-filled gaps stood out to me quite shockingly when I was a small child.  Then I stuggled to understand the stark modern structures juxtaposed between the ornate 18th and 19th century terraces.
I grabbed the opportunity to photograph some of the few remaining food shops in Soho. I managed to miss Lina Stores but Camisa, Gerry's & Vintage House are all still there along with Patisserie Valerie. In  a previous post I mentioned my Aunty Vera who was brought up living in Soho pre- & post-war.  I love the fact that these few shops like Lina and Camisa have changed so little since this was her home.  I didn't really have a food shopping head on, as i am still so limited in what I can eat but I am still kicking myself for missing the truffles from Camisa.  Across the road Gerry's window as ever was attracting attention from passers by.  I can stare and read and imagine the flavours of the different spirits and blends just like every one else, and not notice an hour slip.
Liberty's window displays are as stunning as ever this Christmas. I was interested to see the complete rejection of stark style & beauty in favour of kitsch home scenes with a scale that reminded me of my grandpa's 2-up 2-down in Lancashire in the 1970s.  I loved the pantomime dames too.

A final stroll down Regent Street passing below the under-stated Christmas lights though I was looking for the giant spider which surely accompanies them, and back down to Trafalgar Square.  I love the scale of the National Gallery and especially the Sainsbury wing. It took a while for it to grow on me, but now I love its' cavernous scale, graphic reworking of 18th century architectural finishes and stark lines.  'The Sacred made Real' is an exploration of the 16th century Roman Catholic iconography which is found mostly in the churches and monasteries of southern Spain. These are the figures that make up the tableaux which are venerated as they procession around the towns in Holy week leading up to Easter each year. I have seen these figures in churches across Europe but had never pondered on how or when they were created. Without thinking about it too deeply I realise that I had come to the conclusion they were 1950s shop mannequins! How far was I from the truth. This was also (& I have no good reason for this) the first exhibition that I had viewed with a really good audio guide which brought life and understanding to these surreal figures and paintings: I definitely recommend a visit.
And that's it, a quick wander round West One to try out a borrowed camera.


Monday 23 November 2009

Braised duck and red cabbage


For several years I have worked every Sunday, either on farmers markets or in the bakery.  Happily our delivery scheduled has recently change and now I can roll out of bed at 9.50 instead of 5 or 6 am - a complete luxury.  I can't quite stop myself gazing up at the leaden skies with horror at the impending rain, but it will take ages to get out of that habit! 
Because of our work history we don't eat Sunday lunch in our house, but we do have a good Sunday supper. Selling at farmers markets every weekend meant that by Sunday evening our fridge would be stuffed full of delicious buys and swaps - enough to see us through the week and beyond. Sunday evening was a quiet moment to savour a fridge full of seasonality and carefully crafted products, a luxury that would have be unattainable on our normal income so we relished our luck.  I really don't miss the hours, the cold and the back ache, but when it come to Sunday evenings and I start to put a meal together, I really miss the amazing foods that we used to enjoy everyday.
Nigel Slater had a recipe on Simple Suppers recently which elicite moans of delight in our living room -  it was duck stuffed with red cabbage.  However it wasn't the duck which garnered the emotion but the cabbage! 

So this was Sunday's supper: duck legs braised with red cabbage, served with puy lentils and roast potatoes.  As both the meat and potatoes are off limits for me, I baked a stuffed baby squash with brown rice, beetroot, leeks & fresh ginger and will blog this shortly.
You can cook this recipe with a whole duck, either by jointing or leaving the bird whole.  If you do use a whole bird, prick all over before frying all over and adjust the cooking time according to the weight of the bird and the cooking instructions that came with it.
Most recipes add sugar to the red cabbage but with the prunes, pommeau and apple you should find that the recipe is sweet enough. If you need a little more acidity you can add the juice of half a lemon or 10 ml (1 dsp) red wine or sherry vinegar.

Braised duck and red cabbage

100g prunes, soaked in 50g of brandy or pommeau (I had run out of brandy)
3 ducks legs
450g red cabbage
1 dessert apple
1 heaped tsp (5g) cumin seeds
200ml red wine (I used an Australian Cabernet Sauvignon)
2-3 sprigs fresh thyme
2 bay leaves
200ml chicken stock

Method:
  • Stab the skin of the ducks legs all over with a fork and then put them skin side down in a frying pan.
  • Cook over a gentle heat allowing the fat to render off the legs for about 15 mins
  • Shred the red cabbage finely and chop the apple (core but don't peel).
  • Put 2 dessertspoons (20ml) duck fat from the rendering legs into a heavy-bottomed casserole (with a lid) over a low heat.
  • Add the red cabbage and a sprinckling of salt then toss gently in the fat to soften.
  • Add the chopped apple and the cumin seeds, stir to combine then pour in the prunes and pommeau.
  • Pour in 200ml red wine and season well with black pepper.
  • Tuck the bay leaves into the red cabbage 
  • Pour over the chicken stock then bring the pan to the boil, .
  • Strew over the thyme sprigs and lay the ducks legs over the top.
  • Put a lid on the casserole and put it into the oven at 160°C for an hour or so.
Lots of braised dishes benefit from resting 24 hours before serving and this is no exception.  Stick it in the fridge and warm through the following evening and you'll find the flavours even more pronounced and delicious than if you ate it straight away.  Of course, we couldn't wait and devoured the lot as soon as it was cooked, hence no plate shots!

Sunday 22 November 2009

gluten free chocolate cupcakes


With no apologies, this is another recipe baked to cheer up the teen. She is already sorely missing the summer sunlight and the other day, life got a bit too much for her.  She had a miserable day for no particular reason (we all know that feeling) and then got soaked on the way home.  She was so down in the dumps, I wasn't sure what - apart from the new season's unaired Gossip Girl episodes - would cheer her up.  As I am neither pirate nor hacker, she had to suffice with repeats and a plate of cupcakes!


I haven't baked cupcakes for years so I scaled down my old recipe and reworked it for us today.  Naturally it's gluten free and for the benefit of my conscience, a bit healthier, using a natural sweetener as well as sugar in the cakes (but I forgot to do the same in the icing).  The teen hasn't noticed the difference so far, well, not until she reads this!

Ingredients
  • 2 medium eggs
  • 175g castor sugar
  • 75g light agave syrup
  • 1 tsp vanilla extract
  • 125ml (1/2 cup) rapeseed or sunflower oil
  • 200g white rice flour
  • 60g cocoa
  • 40g millet flour
  • 30g tapioca flour
  • 30g glutinous rice flour
  • 6g (1 dsp) arrowroot flour
  • 1.5 tsp gf baking powder
  • 1/2 tsp xanthan gum
  • 150ml (1/2 cup) rice or cow's milk 
Icing:
  • 125g (1/2 cup) margarine
  •  125g (1/2 cup) butter
  • 1 tsp vanilla extract
  • 425g (3.5 cups) sifted confectioners' sugar
  • liquid colourings as required + 1 tbsp milk
  • 75g cocoa powder (1/2 cup + 1 tbsp)
  • 100g dark chocolate melted in 50g milk
Method
  • line 16 holes in 1-2 deep muffin pans with cupcake liners (I used 2.5" liners)
  • weigh up all dry ingredients and sieve together.
  • preheat oven to 180° C.
  • beat eggs and sugar in a mixer for one minute until the mix makes thin visible ribbons on the surface.
  • add agave nectar & vanilla extract, beat for another 30 seconds.
  • add dry ingredients, along with the oil and milk.
  • beat everything together for 1 minute.
  • using a dessert spoon, scoop a large spoonful of the mix and use to fill one liner
  • repeat until all the mix is used.
  • bake for 20 mins until firm and a skewer inserted into the tcake comes out clean.
  • leave he cupcakes to cool in the tin for 5 mins before removing to a cooling rack.
  • ice once cold.
Icing
  • this makes too much icing but I find it to fiddly to make smaller quantities
  • melt the chocolate in milk in the microwave (approx 30 secs in 800W oven)
  • stir to ensure it is fully blended and creamy
  • beat butter and margarine together in food mixer or processor until soft and creamy(unless you bravely do this by hand).
  • divide this mixture in half, leaving just 125g in the mixing bowl.
  • sift in 250g (2 cups) icing sugar and mix till combined - this will give a stiff mix.
  • divide this equally into small bowls - 1 for each colour.  
  • add colouring as per instructions and mix into the icing
  • add milk, 1 tsp at a time to make a smooth but slightly stiff icing paste
  • cover each bowl with damp cloth and set aside whilst you make the chocolate icing
  • put the rest of the butter mix into your mixing bowl
  • sift 175g (1.5 cups) icing sugar & 75g cocoa powder into the butter 
  • mix until fully blended
  • add milk, 1 tsp at a time, until the icing is creamy but still stiff
  • add the melted chocolate ganache mix to the chocolate icing
  • mix briefly and then scrape into smaller bowl or piping bag ready to use.


We decorated our cakes simply using teaspoons to spread the icing - not a professional job but lots of fun.  The teen shredded some chocolate for decorating.
We also made very pink colouring by grating 40g beetroot and squeezing the juice through a piece of gauze.  This gave about 2 tbsp juice which we used like normal food colouring.  Our green colour was achieved using colouring (I haven't started squeezing spinach or wheat grass for colouring ... yet!).


Wednesday 18 November 2009

Christmas is coming - Panforte di Siena

I love Christmas food and especially baking, however it can be a bit tedious for gluten free eaters unless you have a bit of time to plan in advance.  I normally become a bit obsessed in the weeks leading up to the holidays, baking to fill the house with aromatic spices & delicious snacks to ensure that there are enough tasty bites for us all to share. 
This year I am starting a bit early with the baking as I'll be putting my feet up in hospital just before Christmas (the lengths some people go to for a rest!), so I am already thinking about my favourite snacks and squirrel-like, I'm making and storing some away.  Parmesan crisps and Union Bar nuts are an absolute must in our house.  I've started making a version of the nuts using fennel & lemon zest as well, which taste just great with a G&T. 
Usually, I make traditional gluten free Christmas cakes but this year my diet restrictions have put this recipe out of reach. Trying to find a cake which was egg free and contained no added fat seemed like an impossible task, but I was wrong, thank you to the Italians!
Panforte di Siena packs a spicy punch wrapped up in sticky rich fruit and nuttiness - now isn't that the perfect festive combination?  Lots of the recipes I found had a lot more sugar and honey, but this has a base of dried figs instead which are both naturally sweet and perfectly festive.  If you can, use whole pieces of peel and cut them into rough chunks about 1cm square, this will give a more interesting texture and gives a rustic look to the cake.  To make your own candied peel, you can use this recipe from the L.A Times, it is very easy to do and the results will lift this cake to another level. If I was going to the trouble of making my own peel, I would definitely use fresh spices, lightly toasted and fragrant, freshly ground.


The recipe may look really long, but it is very straightforward and, dare I say it, easy?!  I have baked a couple of test runs to make sure I get the fruit and spicing combination right.  The first attempt was definitely too peppery, though not too peppery to eat, of course!  I think this recipe has a good balance of flavours, it certainly works for my tastes and I hope you like it too.

Panforte di Siena
This is lovely served at the end of a meal, either with cheese or with coffee (or both!).


Ingredients:
  • 100g blanched almonds
  • 100g hazelnuts, unskinned
  • 240g dried figs, chopped (you could substitute dates, prunes or a mix of all 3, instead)
  • 75ml water
  • 50g honey
  • 1 tsp ground coriander
  • 1/2 tsp ground cinnamon
  • 1/2 tsp crushed cardamom seeds
  • 1/2 tsp ground nutmeg
  • 1/4 tsp ground cloves
  • 1/4 tsp finely ground black pepper
  • 100g light muscovado sugar
  • 70g whole glace cherries
  • 70g organic apricots, chopped
  • 70g candied orange peel, chopped
  • 40g candied lemon / citron, chopped
  • 60g rice flour
  • 30ml pommeau or vin santo, or moscatel
  • 1 orange, zested and juiced.
  • 2-3 sheets rice paper
  • clean tea towel and a baking sheet
  • lots of icing sugar
  • 1 x 21cm square or 25cm round tin, lined with baking paper
Method:
  1. preheat the oven to 150°C
  2. on a baking sheet make 2 separate heaps, one of the hazelnuts, the other of almonds.  
  3. toast the nuts in the oven for 12 minutes.
  4. when they are done tip the hazelnuts onto the tea towel and wrap them up.  rub the nuts inside the tea towel, the friction should flake the skins off.  pick the nuts out and shake the dusty skins into the compost or bin.
  5. layer the rice paper over the baking paper in the base of the tin - this will form the base for the cake
  6. put the chopped figs in a medium sized sauce pan with the water (add more if required to just cover the fruit).
  7. measure out the spices and add them, with the honey & sugar to the pan
  8. heat the pan, stirring occassionally and cook for 10 minute until the water has been absorbed creating a soft and sticky paste
  9. take the pan off the heat
  10. add the fruits & orange zest and mix in thoroughly
  11. add the nuts, and do the same
  12. sieve the flour into the pan and stir to mix through
  13. pour on the orange juice and alcohol
  14. stir to mix
  15. spoon the mix into the tin and spread gently to create a thick even layer
  16. bake for 30-40 minutes 
  17. remove from the oven and leave to cool in the tin
  18. to serve, dredge with icing sugar*
*If you are not serving this immediately, don't dust with the icing sugar instead wrap the cake in cling film before storing in an airtight box or tin.  Don't forget to the icing sugar before serving though.

Sunday 15 November 2009

sweet cucumber pickles & ginger-pickled carrots


I've just discovered I really like making pickles!  I usually write up my recipes as I go, to ensure that I don't forget any stages, but I was so engrossed with this from the beginning I almost forgot.
I've been reading blogs all autumn full of ingenious recipes for pickling but I was very unsure about how to create the right balance of flavours - it didn't really dawn on me to taste the spicing vinegar.  The original plan was to make 2 completely different types of pickles using different types of vinegar to try out their flavours.  As it turned out 1x568ml bottle of distilled vinegar was enough for both the cucumber pickles and the carrot ones, so I just added some additional spice to the carrot, which I made second. I used 2 x 0.5L 'Le Parfait' style jars along with 1 old Bonne Maman jar (this had +20% so a bit bigger than the usual size).
Both the carrots and the cucumbers look really good so will make good Christmas presents.  I am sure that I will be making more of these in the next couple of weeks.


Sweet pickled cucumbers

Ingredients:

  • 500g mini cucumbers, halved
  • 25g (1 tbsp + 1dsp) salt
  • 1.5 tsp mustard seed
  • 1 tsp fennel seed
  • 1 tsp coriander
  • 10 white peppercorns
  • 10 black peppercorns
  • 1 bunch dill
  • 568ml distilled vinegar
  • 175g white sugar
  • 1 x 1L sterilised pickling jar
  • 1 x 500g sterilised pickling jar

Note:  I tasted the dill pickles a week after I made them.  They are really good: sweet yet slightly salty crunchy and spicy.  If you like things a bit more toned down, you could use 150g sugar and 17g salt.  

Method:
  • wash then sterilise jars in an oven at 140°C for 15 minutes, cool whilst preparing the cucumbers
  • fill a pan with water and bring to the boil
  • wash  and halve cucumbers (quarter if very plump)
  • blanch the cucumbers in the boiling water for 1 minute
  • drain and rinse in cold water
  • allow cucumbers to cool and dry
  • add the vinegar, spices, sugar and salt to the empty saucepan used to blanch the cukes.
  • bring to the boil, and if you can bring yourself to, taste the vinegar to check the balance of sugar and salt.
  • adjust with extra sugar or salt as you wish
  • dunk a few sprigs of dill into the boiling vinegar for a few seconds to sterilise (I have no idea whether this helps, it just seemed like a sensible idea)
  • pack the cucumbers and dill into the jars
  • pour the spiced vinegar over the packed jars, ensuring the vegetables are fully covered
  • lid with acid-proof (ie not exposed metal) sterilised lids 
  • store in a dark cupboard for 3-4 weeks before serving
  • store in fridge after opening and consume within 1 month

Ginger pickled carrots
Using the (250g)  left over pickling vinegar so I decided to pickle some organic carrots with fresh ginger

Ingredients

  • 300g organic carrots,
  • pan of boiling water for blanching the carrots
  • leftover pickling vinegar
  • 15g peeled and thinly sliced fresh ginger

Method:
  • wash, peel and quarter the carrots length-ways (to create spears) 
  • blanch the carrots for 1 minute then drain and rinse in cold water
  • bring the spiced vinegar to the boil and add the ginger
  • taste vinegar to check for seasoning
  • pack the carrots into a 0.5L sterilised jar
  • pour the vinegar and spices over ensuring the vegetables are covered
  • lid with acid-proof (ie not exposed metal) sterilised lids 
  • store in a dark cupboard for 3-4 weeks before serving
  • store in fridge after opening and consume within a couple of weeks

Thursday 12 November 2009

gluten free gnocchi


It's definitely Autumn now!  Of course you can't have failed to notice that, the leaves are blowing from the trees, daylight fades at 5pm and the rain falls as much as the sun used to shine. Winter boots are replacing sandals and the central heating clicks on for the first time since spring.  I haven't altogether let go of my comfy birkenstocks but I am embracing autumnal foods very happily.
Here is a recipe for squash & sweet potato gnocchi.  These are free from potatoes and wheat flour so are great for both gluten free and nightshade free diets.  I was really disappointed when I thought that I would have to give up gnocchi, so I was relieved to realise that this wasn't the case.

The first time I cooked this recipe with just squash, but the little dumplings seemed to be a little bit squeaky in your mouth and just not substantial enough.  Adding the sweet potato gives a firmer dough which is easier to roll and much, much more satisfying to eat.  The extra starch means that these freeze a lot better than squash only, so you can make more and freeze for quick mid week suppers
I was looking for a slightly bitter sauce to cut through the natural sweetness of the gnocchi, so - as pictured - I served the gnocchi here with a drizzle made of blanched dandelion leaves, garlic and olive oil.  Making this again I will make the sauce with equal amounts of dandelion and either spinach or rocket to balance the strong flavour of autumnal dandelion, but I was pleased with the results as I have never tried cooking with dandelion leaves.

Gluten free Gnocchi with a dandelion drizzle (serves 4)

350g squash, or piece of  (raw and unpeeled)
1 x 400g sweet potato stabbed with a fork all over
1 free range egg (medium)
120 g (3/4 cup) rice flour
30g (1/4 cup) glutinous rice flour 
1/2 tsp xanthan gum

Preparation
  • Microwave* each vegetable for around 5 mins each for an 800W oven until they are soft and cooked throughout.  Set to one side to cool whilst you prep the flour.
  • Sieve 120g rice flour with 30g glutinous rice flour and just under 1/5 tsp xanthan gum.
  • Once the vegetables are cool enough to handle, scoop the flesh from the skins (scrape to get every last morsel).  Mash the vegetable flesh together with a potato masher (or whizz briefly in a food processor).  If the puree is still warm, wait for it to cool (rather than cold) before you move on to the next stage.
Making the dough
  • Beat the egg gently and then add to the vegetables, stir through until the egg is combined making a smooth thick batter.
  • Season with a bit of salt and black pepper (taste if you don't mind the raw egg).
  • Some squashes are drier than other varieties and this will dictate the amount of flour you need to add.
  • Sprinkle one tablespoon of the flour mix at a time over the vegetable batter, and stir until throughly combined.
  • Continue doing this until the batter is too thick to stir and needs to be kneaded by hand (for me this was after adding 75g flour (i used a buttercup squash which is quite firm and dry).
Forming the gnocchi

  • Sprinkle your work surface with more of the flour mix and scrape the dough out onto the worktop.  If the dough is still sticky, knead some more of the flour in until the dough holds it's shape.
  • Form into a block and cut into 4 pieces, roll out 1 piece to make a long sausage no more than 2cm wide.
  • With a wet knife, cut 2cm lengths along the length of the dough - it should make around 15-18 pieces per portion.
  • Form the dough into gnocchi (see below for over complicated instructions - why didn't I take photos of the process?!
  • Continue until you have rolled all the dough and then leave to dry for at least 30 mins before cooking.

To make the drizzle.
  • Pick about 20 small (less than 7cm) dandelion leaves and wash them.  Fill a 1 pint bowl with cold water and set by the hob.
  • Bring a little pan of water to the boil, drop the leaves in and let them boil for about 30 seconds.
  • Lift them out with a draining spoon and dunk them straight into the cold water.
  • Allow to cool for a minute or two, the scoop them out with your hand and squeeze hard to extract all moisture.
  • Chop finely along with 1/4 clove fresh garlic.
  • Put both in a small bowl and drizzle over some olive oil.
  • Mix then taste, season with salt and pepper as required.

To cook the gnocchi
  • Bring a large pan of water to a rolling boil.
  • Salt - approx 10g per litre of water.
  • Add gnocchi and let the pan come back to the boil.
  • As soon as the gnocchi rise to the surface (1-2 minutes) they are cooked, so drain them and serve with the drizzle, and grated parmesan if you can eat it.

Instructions for forming gnocchi (if you need them)
  • Roll each piece of dough in the palm of your hand to make a ball (dust with a little flour if necessary).
  • Balance the dough ball between your middle finger and your 3rd finger (ring finger in the UK) then grab a fork and drag the fork gently over the top of the ball - the dough will lengthen slightly as it moves and pick up the markings of the fork.  
  • If you drag the fork across your fingers, the gnocchi will be stopped by your ring finger and slightly squashed - that will make a little dent in the back of the gnocchi which increases the surface area and makes it cook quicker.
  • The fork grooves help your sauce stick to the gnocchi meaning you get a perfect portion of sauce & dumpling with each forkful.

*Microwaves:  I recently contributed to forum chat on the UK Food Bloggers Association discussing microwaves.  I realised then I don't really use mine much, and certainly not for cooking, just heating stuff up.  Using the microwave to cook these vegetables was much quicker and much more efficient than the oven.  I was suprised that the results were just as good as oven roasting, with a little caramelising on the cut surfaces of the squash.  I will definitely try this again.

Monday 9 November 2009

Apple and blackberry crumble


I don't bake sweet treats at home anywhere near as often I as should, which I supose makes the name of the blog a misnomer.
Kate the bake comes from me being a baker by trade rather than writing a blog full of baking recipes.  Perhaps I should include more baking recipes to rectify this.
As Autumn hurries on whipped up by strong winds and driving rain, we find ourselves craving comfort food.  Today faced with a pile of fresh eating apples and the blackberries that I strained our out of our blackberry vodka, I realised that I really needed to find a home for both.  So here is a blackberry and apple crumble (or crisp).  I have made this with a gluten free topping of course,
and have used a mixture of rice and maize flour, but you could add gluten free grain flakes for a bit of texture and vary the spices depending on the fruit.

Blackberry & Apple crumble

Ingredients
400g (4 small) dessert apples, peeled, cored and chopped.
100g blackberries
1 lemon - zest only
1/2 tsp vanilla extract

Fruit method:
  • Put the fruit in a pan with a splash of water (a tablespoon or so) and let simmer over a low heat for 5 minutes.
  • Taste the fruit & sweeten with dk brown muscavado (turbinado sugar) or agave nectar if very tart.
  • Add the zest and vanilla extract, stir through.
  • Pour the fruit into a baking dish - I used several small dishes for individual portions but I guess that an 8" or 9" square ceramic dish would be fine.

Topping
90g (1/2 cup) rice flour
80g (1/2 cup) maize flour
115g (1/2 cup) castor sugar
90g (1/2 cup) dark muscavado sugar (turbinado sugar, I think)
1/2 tsp ground cinnamon
125g (1 stick) cold butter

Topping method

  • weigh out flours and cinnamon, sieve together
  • weight out sugars and stir into flour
  • finely chop butter and add to flour mix
  • rub in as if you were making pastry until you have a  sticky bread crumb mix ( you can do this in a food processor).
  • spoon the topping over the fruit in the baking dish creating a thick even layer.
Place the baking dish on a lined tray to catch any drips.  Bake in a preheated oven for around 40 mins at 190 deg C, until the crumble is browning on top and the juices are oozing up the sides of the dish.
Serve with whilst still warm just as it is or with yoghurt, cream, custard or ice cream.


    Sunday 8 November 2009

    Hummous two ways


    The 16 year old just rolled in from her friend's birthday party (it was 12.40pm the day after).  She is normally a remarkably well-behaved young lady but I had been forwarned by her text at 9am ("I just threw up!" said with some pride) that she may feel a little delicate.
    I tried to think of something to snack on which would give her some energy and protein without resorting to the good old English breakfast routine laden in grease.  So it was that I found myself skinning chick peas to make hummous.


    I know it is completely unnecessary to skin them, as the skins are perfectly edible, but it makes a dramatic difference to the quality of the finished product, and, it's not as if I have anything else to do - according to the teen anyway!